
EggHunting, if simply put, is a technique in exploit development which is used to search for a specific keyword in an application memory space to further aid in the exploit if there is a length restriction. Egg in this case refers to specific keyword/pattern and “hunter” as put you’re searching in all the accessible address space to find the pattern, hence the hunt.
Before we begin, we must understand the need of the egghunting technique. Consider a scenario where you are trying to exploit a buffer overflow but for some reason, you are unable to put the shellcode due to the length limitation of input (we will see this later in action). Given as an exploit developer, the end goal is always to get code execution by using any method possible.
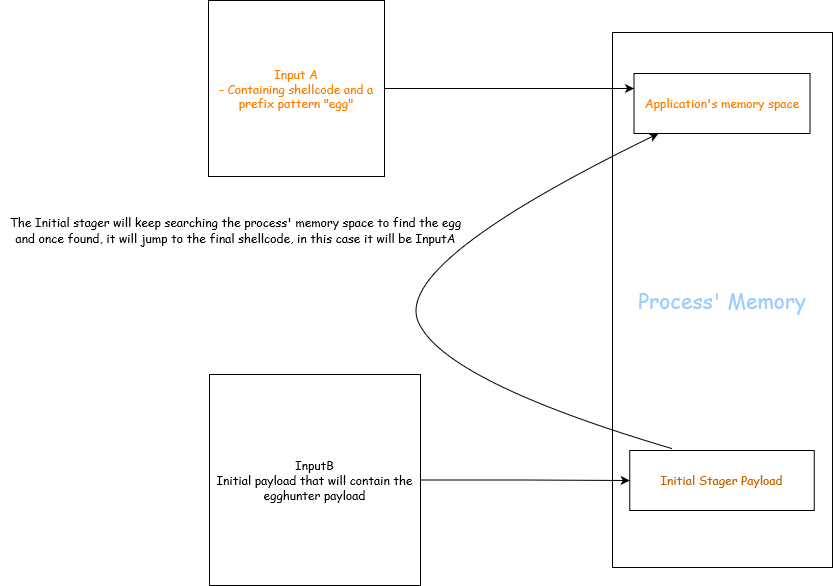
Scenario like this is where creative thinking comes handy, let’s say you have another input field which can have your shellcode/payload but that buffer is not writing instruction pointer. Consider following example:
InputA -> Large buffer but does not trigger overflow |
Here, if we were able to put our payload in InputA and somehow overwrite the instruction pointer to the address of InputA during the overflow trigger via InputB we can gain shellcode execution.
Following image shows it in a better way:
This should clear it up but there’s always a part which confuses most is the part where this comes handy. To understand it better, we will do a hands-on practical to understand it in a deeper level. This is just to understand the fundamentals of egghunting technique so that once presented with an actual exploitation of this, it will be easier to make sense out of the overall process.
Now, we have following things cleared out:
- Egghunting is used when the buffer space is limited and we are unable to execute our shellcode directly. (Shellcode in this case refers to the one which gives us reverse shell). For example, let’s say we are able to write overwrite 1056 bytes but the EIP is being overwritten at 1000 bytes, that leaves you with just 56 bytes of space to put shellcode which will not be possible compared to the vanilla buffer overflow, hence we make use of this technique to expand our control. (Given a simple shellcode from
msfvenomis of >300 length) - This technique does not necessarily expects control over a second input field where our final shellcode will reside but it can also be on one single buffer but it depends how it parsed by the application and where the overflow is limited.
- Lastly, the principle of this is to search into all the address space of the memory to find an “egg” (pattern) which we have specified and once found, it pass the identified address to the instruction pointer which will then execute the stored shellcode.
Analyzing the EggHunting Shellcode
There is a well known paper that explains the overall methodologies of egghunting and how it can be used, it was written by Skape. It is recommended to read it to understand two different ways the egghunting technique can be deployed but we will use the syscall technique as I prefer that and it is very simple to grasp.
Before we begin, I will be using the NtDisplayString syscall and the shellcode is supposed to work on Windows XP and the 0x43 is used to specify the NtDisplayString syscall. The reason we are using NtDisplayString is because as quoted by Skape himself: “The NtDisplayString system call is typically used to display text to the blue-screen that some people are (unfortunately) all too familiar with. For the purposes of an egg hunter, however, it is abused due to the fact that its only argument is a pointer that is read from and not written to, thus making it a most desirable choice.”
It makes sense as NtDisplayString function accepts one argument which is a pointer to memory and read the string from the memory:
NTSYSAPI |
It is also a good thing to note that if this function gets a memory address which for some reason is not accessible, it will throw a STATUS ACCESS VIOLATION or 0xc0000005 value.
Here is one sample egghunting shellcode:
0x0000000000000000: 66 81 CA FF 0F or dx, 0xfff |
This is a classic EggHunter shellcode, assuming you know a little bit about assembly such as mov , pop and conditional jumps, there is two things that still stands out here:
scasd: This compares dword (4 bytes value) ofeaxwithediand sets the appropriate flags which is used for conditional jumpsint 0x2e: This instruction triggers a software interrupt, inx86architecture the0x2eis associated with system call. The value0x2eis specified for system call, basically asking kernel to do some operation from user-mode. In simpler terms, there are specified syscalls a user can request kernel to perform and to do that one can useint 0x2e. There are many different syscalls that can be requested, theeaxregister holds an integer value which specifies the operation we are requesting. It is to be noted that the different integer values are assigned for different operation.
Let’s just assume that we have taken a control of EIP and somehow made the execution our egghunting shellcode, now I will walk you through how it works, we will break it down:
0x0000000000000000: this line performs OR on thedxregister with value of0xfff,edxregister is here to keep track of the memory address space.0x0000000000000005: this instruction increments the value ofedxby 1.0x00000000000000006to0x000000000000000a: First off, his pushes the value ofedxto the stack and then pushes the value0x43to the stack as well, then it performspop eaxbasically making theeaxholds the value0x43which is forNtDisplayStringsyscall and finally it callsint 0x2eperforming the syscall operation.0x000000000000000cto0x000000000000000f: Here, we check if thealregister holds a value of 5 from the syscall result, if it does then it will pop theedxregister and jump the first instruction again. By this point, it is safe to know that this is a loop where the shellcode keeps incrementing theedxvalue and checking if the value is equal to 5 or not, if it does keep continuing.Note that the reason we just check 5 while the returned value is
0xc0000005is because thealis a 8 bit register and refers to low-order 8 bit of eax hence it will contain50x0000000000000011to0x0000000000000016: Here, we are loading the value of our defined “egg” i.e.w00tbut in little endian format (reverse order) is loaded toeaxand then theedx(memroy space reference) value is moved toedi.0x0000000000000018to0x0000000000000019: Then thescasdinstruction is called which is used to compare theediandeaxby default, hence it checks the value of our egg with whatever the value holds byedi’s memory address. (remember it used[edi]which is for accessing the value stored at the memory pointed byedi). Once the comparison is done, if the comparison fails the execution goes back toinc edxwhich increments page by1and the loop continues to check the access and then the values.0x000000000000001bto0x000000000000001e: This again checks the value hold byediwith our egg but is only called when the firstscasdinstruction found ourw00tif not, it won’t even touch this piece of code but once the firstscasdfinds the egg, this instruction will check the next 4 bytes stored after the first identifiedw00tand if the comparison returns true meaning that the nextw00tis found, ajmp ediinstruction is called which will make the program to jump to the memory where the egg was found successfully executing our main shellcode.
At this point you are wondering why we have two calls of scasd , good question. the reason being is that during the exploitation phase we write 8 bytes of pattern/egg, in this our first stage shellcode looks like:
w00tw00t + shellcode |
Having a unique 8 byte egg helps in not having any false positive during the analysis of the memory for finding this very egg.
Another is why instead of using scasd why not go with cmp , there are few reasons for that, first is that when writing a shellcode a rule of thumb is that less bytes of shellcode and since we already making use of eax , edi registers and scasd is specifically designed to compare double words (4 bytes) and by default it checks the eax and edi which helps in achieving that because we will have less unnecessary insturctions in our shellcode. Often times, you might have to tackle with bad characters and it is very good practice to use whatever good option is there and of course, given the shellcode actually searches through the memory space, you would want the shellcode to be more efficient hence the scasd
I hope you have understood how egghunting technique works and if required, you can now write your own egghunting shellcode or use an existing one and modify it according to your need.